
Réamhrá le Deisiúchán Smartphone LCD
Tá fóin chliste greamaithe go praiticiúil dár lámha na laethanta seo. Mar sin, nuair a scoilteanna scáileán, flickers, nó téann go hiomlán dubh, scaoll a leanas go minic. Ach seo an dea-scéal: Ní draíocht é athsholáthar scáileáin LCD - is scil é. Agus mar aon scil, is féidir é a fhoghlaim leis an treoir cheart.
Téann an lámhleabhar láimhe seo leat tríd an ar fad próiseas athsholáthair smartphone LCD, ó uirlisí agus sábháilteacht go suiteáil agus tástáil. Smaoinigh air mar léarscáil deisiúcháin - soiléir, praiticiúil, agus atá deartha le haghaidh rath sa saol fíor.
Cén Fáth a bhfuil Scileanna Athsholáthair Scáileáin LCD Damhna inniu
Tá damáiste scáileáin ar cheann de na teipeanna smartphone is coitianta ar fud an domhain. Is féidir airgead a shábháil le foghlaim conas scáileán LCD a athsholáthar, r-dhramhaíl a laghdú, agus fiú doirse a oscailt le gairm deisiúcháin. Do thosaitheoirí, is é an pointe iontrála foirfe é freisin maidir le deisiú gutháin.
Cé Leis an Treoir Seo
Tá an treoir seo tógtha do dhíograiseoirí DIY, caitheamh aimsire teicneolaíochta, agus teicneoirí deisiúcháin leibhéal iontrála. Má cheap tú riamh, “Ba mhaith liom go bhféadfainn é seo a réiteach mé féin,” tá tú san áit cheart.
Scáileáin LCD Smartphone a thuiscint
Sula tumadóireacht isteach le huirlisí, tá sé tábhachtach a thuiscint cad atá á dheisiú agat.
LCD vs OLED - Bíodh a fhios agat Cad atá á Deisiú agat
Úsáideann scáileáin LCD backlight chun picteilíní a shoilsiú, fad is a lasann scáileáin OLED gach picteilín ina n-aonar. Tá go leor fóin chliste lár-réimse agus níos sine fós ag brath ar LCDs, rud a fhágann go bhfuil siad coitianta i gcásanna deisiúcháin. Go ginearálta tá LCDs níos inacmhainne ach beagán níos tiús agus níos casta a scaradh.
Cásanna Coitianta Damáiste LCD
Damáiste Fisiciúil
Gloine scáinte, coirnéil shattered, agus is iad spotaí brú na comharthaí is soiléire. Fiú má oibríonn an taispeáint fós, Is minic a théann damáiste struchtúrach chun donais le himeacht ama.
Teipeanna Taispeána agus Tadhaill
Línte ar an scáileán, baint taibhse, réimsí neamhfhreagracha, nó is minic a léiríonn aon taispeáint ar chor ar bith damáiste LCD nó cábla flex.
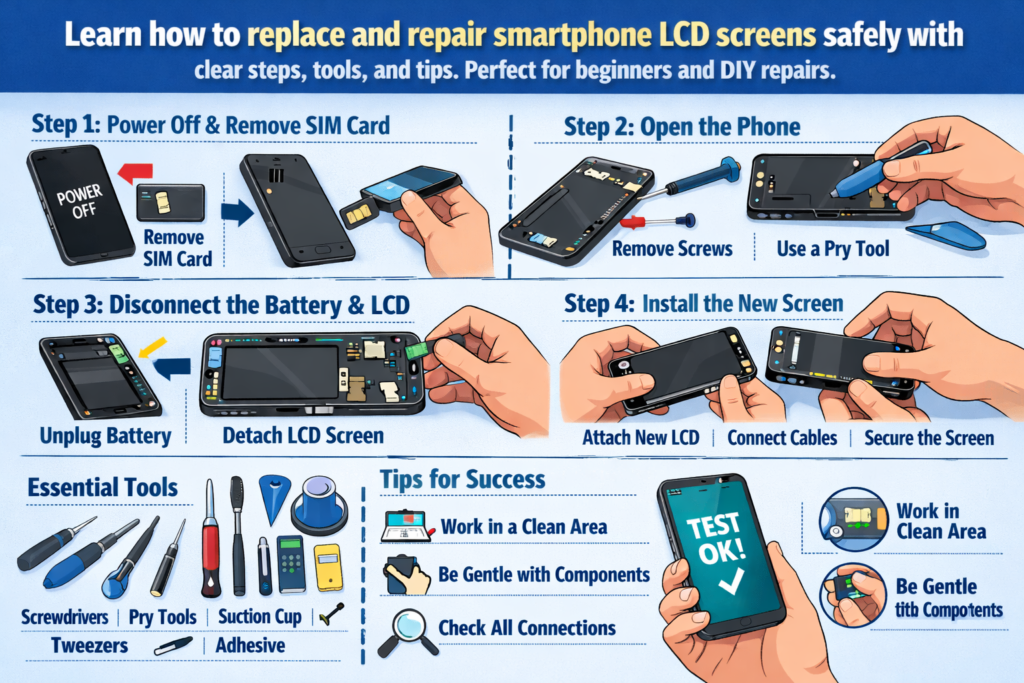
Uirlisí agus Ábhair Riachtanacha a Ullmhú
Níl deisiúchán ach chomh maith leis na huirlisí taobh thiar de. Is ionann úsáid uirlisí míchuí agus cócaireacht le casúr - is féidir, ach messy.
Bunúsacha Uirlisí Deisiúcháin
Ar a laghad, Beidh gá agat leis:
- Scriúróirí beachtais
- Uirlisí plaisteacha pry
- Tweezers
- Cupán shúchán
- Foinse teasa (gunna aer te nó eochaircheap teasa)
Uirlisí Gairmiúla vs DIY
Tugann uirlisí gairmiúla rialú níos fearr agus laghdaíonn siad an baol damáiste, ach is féidir le tosaitheoirí tosú le feisteáin DIY ardchaighdeáin. Seachain uirlisí pry miotail nuair is féidir - is marfóirí cábla flex iad.
Earraí Inchaite Níor Chóir duit Scipeáil choíche
Alcól isopropyl, stiallacha greamaitheacha, lámhainní, agus d'fhéadfadh go mbeadh cuma roghnach ar mataí frithstatacha, ach feabhsaíonn siad cáilíocht agus sábháilteacht deisiúcháin go suntasach.
Sábháilteacht ar dtús – Réamhchúraimí Criticiúla Roimh Dhíchóimeáil
Is é gan bacadh le céimeanna sábháilteachta an bealach is tapúla chun deisiú simplí a dhéanamh ina thubaiste.
Cumhacht, Ceallraí, agus Rioscaí Leictreachais Statach
I gcónaí cumhacht as an gléas go hiomlán. Déan an ceallraí a dhícheangal chomh luath agus is féidir chun ciorcaid ghearr a sheachaint. Is féidir le leictreachas statach comhpháirteanna a mharú go ciúin, mar sin tá tábhacht ag baint le bunús a thabhairt duit féin.
Dea-Chleachtais um Shocrú Spás Oibre
Oibrigh ar ghlan, dromchla dea-lit. Eagraigh scriúnna cosúil le míreanna puzail - má dhéantar iad a mheascadh is féidir an máthairchlár a bhriseadh níos déanaí.
Próiseas Díchóimeála Fón Céim ar Chéim
An Clúdach Cúil á Bhaint
Ag brath ar an tsamhail, d'fhéadfadh scriúnna a bheith i gceist leis seo, ghreamaitheacha, nó gearrthóga. Cuir teas milis i bhfeidhm chun greamachán a mhaolú agus pry go mall. Is minic a scoilteann druim ghloine nuair a rithtear anseo.
An Ceallraí a Dhícheangal go Sábháilte
Cén Fáth a Bhfuil Sábháilteacht Ceallraí Neamh-idirbheartaithe
Tá cadhnraí litiam íogair. Ná puncture riamh, lúbadh, nó róthéamh iad. Ní hamháin go bhfuil ceallraí damáiste costasach - tá sé contúirteach.
An Scáileán LCD Damáiste a bhaint
Is é seo croílár an deisiúcháin - agus an chuid is riskiest.
Teicnící Téamh agus Bogadh Greamaitheacha
Tá dáileadh teasa fiú ríthábhachtach. Ní scaoilfidh teas ró-bheag greamachán; is féidir leis an iomarca damáiste a dhéanamh do shraitheanna inmheánacha. Buaileann foighne fórsa gach uair.
Scaradh Scáileáin Gan Damáiste Cábla
Míníodh Criosanna Riosca Cábla Flex
Suíonn formhór na gcáblaí solúbtha in aice le bun nó taobh an scáileáin. Cuir uirlisí pry isteach go héadomhain agus bíodh a fhios agat i gcónaí cá bhfuil cáblaí sula n-ardaítear iad.
Comhpháirteanna Inmheánacha a Iniúchadh agus a Ghlanadh
Nascóirí agus Cáblaí Flex a Sheiceáil
Déan iniúchadh le haghaidh bioráin lúbtha, deannach, nó iarmhar. Is féidir le bioráin mhí-ailínithe amháin a bheith ina chúis le teip taispeána.
Glanadh Greamachán Iarmharach agus deannach
Cinntíonn dromchlaí glan greamaitheacht níos fearr agus cuireann siad cosc ar phointí brú ar an scáileán nua.
Suiteáil an Scáileán LCD Nua
Tástáil Réamhshuiteála
Sula séalaithe rud ar bith, ceangail an LCD nua agus cumhacht ar an bhfeiste. Sábhálann an chéim seo amháin athoibreacha gan líon.
Ailíniú Cuí agus Ceangal Cábla
Botúin Shuiteála Coitianta a Sheachaint
Ná cuir iallach ar chónaisc. Mura ndéanann sé cliceáil go réidh, tá rud éigin mícheart. Fágann mí-ailíniú le sceitheadh solais agus saincheisteanna tadhaill.
Próiseas Athchóimeála
Comhpháirteanna a Athnascadh in Ord Ceart
Déan na céimeanna díchóimeála a aisiompú go loighciúil. Ba cheart go mbeadh an nasc ceallraí deireanach i gcónaí roimh an tástáil deiridh.
An Scáileán agus an Clúdach Cúil a Dhaingniú
Cuir brú fiú agus cead a thabhairt don ghreamaitheach leigheas i gceart. Rushing anseo lagaíonn marthanacht fadtéarmach.
Tástáil Iar-Dheisiúcháin agus Seiceálacha Cáilíochta
Taispeáint, Dteagmháil, agus Tástálacha Gile
Seiceáil aonfhoirmeacht dath, freagrúlacht dteagmháil, agus leibhéil gile. Ná déan dearmad braiteoirí gaireachta agus ceamaraí tosaigh.
Seicliosta Cigireachta Feidhmiúil Deiridh
Glaonna tástála, mhuirearú, cnaipí, agus cainteoirí. Bíonn tionchar ag deisiú scáileáin ar níos mó ná radhairc amháin.
Rioscaí Coiteann agus Conas iad a Sheachaint
Damáiste Cábla Flex
Teipeann an chuid is mó tosaitheoirí anseo. Is iad gluaiseachtaí malla agus uillinneacha ceart uirlisí an chosaint is fearr duit.
Puncture Battery agus róthéamh
Rioscaí Greamaitheacha agus Brú
Is féidir le brú míchothrom scáileán nua a bhriseadh - go híorónta le linn na suiteála.
Ceardaíocht Deisiúcháin agus Caighdeáin Ghairmiúla
Rudaí a Scarann Deisiúchán Glan ó Dhrochcheann
Glaineacht, ródú cábla, agus disciplín tástála a shainíonn obair ghairmiúil.
Scileanna Deisiúcháin Fadtéarmacha a Fhorbairt
Múineann gach deisiúchán rud éigin. Botúin doiciméad - is iad na múinteoirí is fearr iad.
Cathain Gan DIY - Do Theorainneacha a Eolas
Múnlaí agus Cásanna Ard-Riosca
Bezels Ultra-tanaí, scáileáin cuartha, agus ardaíonn braiteoirí tearc-thaispeántais an leibhéal deacrachta.
Costas vs Measúnú Riosca
Uaireanta, tá deisiú gairmiúil níos saoire ná do bhotúin féin a shocrú.
Leideanna do Thosaitheoirí agus Díograiseoirí DIY
Straitéisí Cleachtais
Tosaigh le gléasanna níos sine. Smaoinigh orthu mar rothaí oiliúna.
Ionchais Cuar Foghlama
Beidh tú ag streachailt ar dtús - agus sin gnáth. Fásann scil le athrá.
Deireadh
Ní bhaineann athsholáthar LCD fón cliste amháin le scáileán a shocrú - baineann sé le cruinneas a mháistir, foighne, agus réiteach fadhbanna. Leis na huirlisí cearta, meon sábháilteachta, agus cur chuige céim ar chéim, is féidir fiú tosaitheoirí a bhaint amach glan, deisiúcháin iontaofa. Cibé an bhfuil do ghuthán féin á dheisiú agat nó ag tabhairt céime isteach i saol na deisithe, tugann an lámhleabhar praiticiúil seo bonn láidir duit chun muinín agus scileanna a thógáil.
Ceisteanna Coitianta
1. An féidir liom scáileán LCD a athsholáthar gan uirlisí gairmiúla?
Tá, ach laghdaíonn uirlisí cáilíochta go mór an baol damáiste agus feabhsaítear torthaí.
2. Cé chomh fada a thógann athsholáthar LCD den chéad uair?
Bí ag súil le 1-2 uair do thosaitheoirí, lena n-áirítear tástáil agus athchóimeáil.
3. An bhfuil athsholáthar LCD contúirteach?
Is féidir é a bheith má dhéantar neamhaird ar shábháilteacht ceallraí. Lean na réamhchúraimí go docht.
4. Ar cheart dom an scáileán a ghliúáil roimh thástáil?
Níl. Déan tástáil i gcónaí roimh an greamaitheacht deiridh.
5. Conas a bheidh a fhios agam an bhfuil an LCD nua lochtach?
Picteilíni marbh, saincheisteanna tadhaill, nó mura dtaispeánfar le linn na réamhthástála lochtanna.


