
Úvod do opravy LCD smartfónov
Smartfóny sú v dnešnej dobe prakticky prilepené k našim rukám. Takže keď praskne obrazovka, bliká, alebo úplne sčernie, často nasleduje panika. Ale tu sú dobré správy: Výmena LCD obrazovky nie je mágia – je to zručnosť. A ako každá zručnosť, dá sa to naučiť správnym vedením.
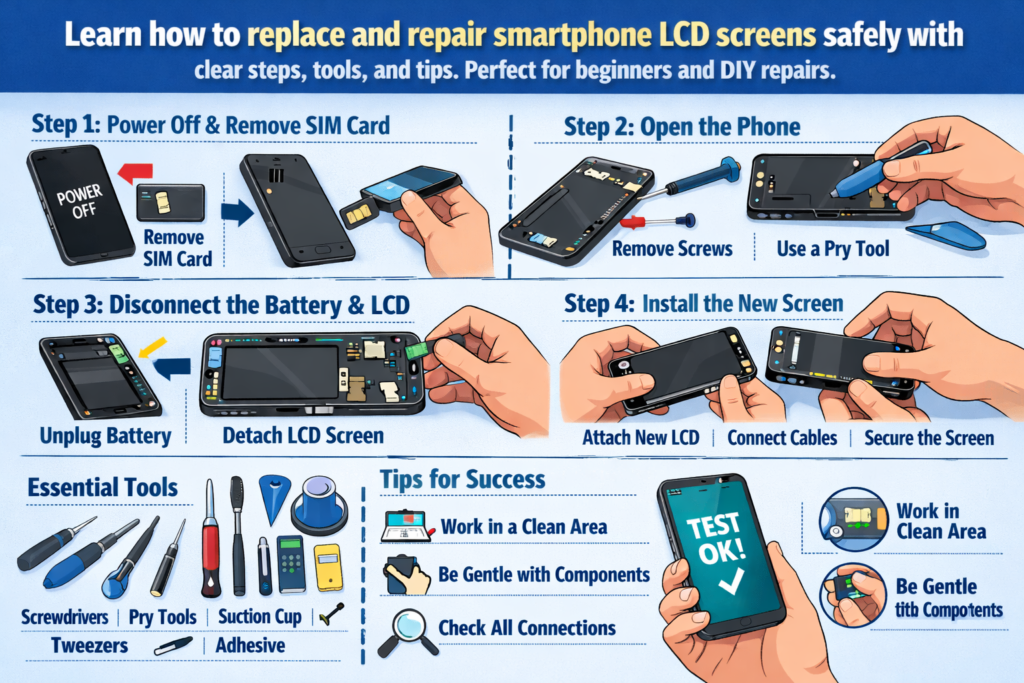
Táto praktická príručka vás prevedie celý Proces výmeny LCD smartfónu, od nástrojov a bezpečnosti až po inštaláciu a testovanie. Berte to ako plán opravy – jasné, praktické, a navrhnuté pre úspech v reálnom svete.
Prečo dnes záleží na zručnostiach pri výmene LCD obrazovky
Poškodenie obrazovky je jednou z najčastejších porúch smartfónov na celom svete. Naučiť sa, ako vymeniť LCD obrazovku, môže ušetriť peniaze, znížiť elektronický odpad, a dokonca otvoriť dvere opravárenskej kariére. Pre začiatočníkov, je to tiež ideálny vstupný bod do opravy telefónu.
Pre koho je táto príručka určená
Táto príručka je vytvorená pre domácich majstrov, technologických nadšencov, a opravárenských technikov základnej úrovne. Ak ste si niekedy mysleli, „Prial by som si, aby som to mohol opraviť sám,“ si na správnom mieste.
Pochopenie LCD obrazoviek smartfónov
Pred ponorením s nástrojmi, je dôležité pochopiť, čo vlastne opravujete.
LCD vs OLED – Zistite, čo opravujete
LCD obrazovky využívajú na osvetlenie pixelov podsvietenie, zatiaľ čo OLED obrazovky rozsvietia každý pixel samostatne. Mnoho smartfónov strednej triedy a starších smartfónov sa stále spolieha na LCD, aby boli bežné v scenároch opráv. LCD sú vo všeobecnosti cenovo dostupnejšie, ale o niečo hrubšie a zložitejšie na oddelenie.
Bežné scenáre poškodenia LCD
Fyzické poškodenie
Prasknuté sklo, rozbité rohy, a tlakové škvrny sú najzreteľnejšími znakmi. Aj keď displej stále funguje, štrukturálne poškodenie sa časom často zhoršuje.
Porucha displeja a dotyku
Čiary na obrazovke, Duch sa dotýka, nereagujúce oblasti, alebo žiadny displej často indikuje poškodenie LCD alebo flex kábla.
Príprava základných nástrojov a materiálov
Oprava je len taká dobrá ako nástroje za ňou. Používanie nevhodných nástrojov je ako varenie s kladivom – možné, ale chaotický.
Základná súprava náradia na opravu
Minimálne, Budete potrebovať:
- Presnosť
- Plastové páčacie nástroje
- Pinzel
- Prísavka
- Zdroj tepla (teplovzdušná pištoľ alebo vyhrievacia podložka)
Profesionálne vs. DIY nástroje
Profesionálne nástroje ponúkajú lepšiu kontrolu a znižujú riziko poškodenia, ale začiatočníci môžu začať s kvalitnými stavebnicami pre domácich majstrov. Vždy, keď je to možné, vyhnite sa kovovým páčiacim nástrojom – sú to zabíjače ohybných káblov.
Spotrebný materiál, ktorý by ste nikdy nemali preskočiť
Izopropylalkohol, lepiace pásiky, rukavice, a antistatické rohože sa môžu zdať voliteľné, ale výrazne zlepšujú kvalitu a bezpečnosť opráv.
Bezpečnosť na prvom mieste – kritické opatrenia pred demontážou
Preskočenie bezpečnostných krokov je najrýchlejší spôsob, ako zmeniť jednoduchú opravu na katastrofu.
Moc, Batéria, a riziká statickej elektriny
Zariadenie vždy úplne vypnite. Odpojte batériu čo najskôr, aby ste predišli skratom. Statická elektrina môže potichu zabíjať komponenty, takže uzemnenie je dôležité.
Osvedčené postupy nastavenia pracovného priestoru
Pracujte na čistom, dobre osvetlený povrch. Usporiadajte skrutky ako kúsky skladačky – ich zmiešaním môže neskôr prasknúť základná doska.
Proces demontáže telefónu krok za krokom
Odstránenie zadného krytu
V závislosti od modelu, môže to zahŕňať skrutky, lepidlo, alebo klipy. Aplikujte jemné teplo na zmäkčenie lepidla a pomaly vypáčte. Ponáhľanie sa sem často praská sklenené chrbty.
Bezpečné odpojenie batérie
Prečo sa o bezpečnosti batérie nedá vyjednávať
Lítiové batérie sú citlivé. Nikdy neprepichujte, ohnúť, alebo ich prehriať. Poškodená batéria nie je len drahá – je aj nebezpečná.
Odstránenie poškodenej LCD obrazovky
Toto je jadro opravy - a najrizikovejšia časť.
Techniky zahrievania a zmäkčovania lepidla
Kľúčom je rovnomerné rozloženie tepla. Príliš malé teplo neuvoľní lepidlo; príliš veľa môže poškodiť vnútorné vrstvy. Trpezlivosť zakaždým porazí silu.
Oddelenie obrazovky bez poškodenia kábla
Vysvetlenie rizikových zón flexibilného kábla
Väčšina flexibilných káblov je umiestnená v blízkosti spodnej alebo bočnej strany obrazovky. Lákadlá vložte plytko a pred zdvíhaním vždy viete, kde sú káble.
Kontrola a čistenie vnútorných komponentov
Kontrola konektorov a ohybných káblov
Skontrolujte ohnuté kolíky, prach, alebo zvyšok. Jediný nesprávne zarovnaný kolík môže spôsobiť poruchu displeja.
Čistenie zvyškov lepidla a prachu
Čisté povrchy zaisťujú lepšiu priľnavosť a zabraňujú otlačeným bodom na novej obrazovke.
Inštalácia novej LCD obrazovky
Testovanie pred inštaláciou
Pred zapečatením čohokoľvek, pripojte nový LCD a zapnite zariadenie. Už len tento krok ušetrí nespočetné množstvo prerábok.
Správne zarovnanie a pripojenie káblov
Vyhnite sa bežným chybám pri inštalácii
Konektory nikdy nasilu. Ak neklikne hladko, niečo nie je v poriadku. Nesprávne zarovnanie vedie k úniku svetla a problémom s dotykom.
Proces opätovnej montáže
Opätovné pripojenie komponentov v správnom poradí
Obráťte kroky demontáže logicky. Pripojenie batérie by malo byť vždy posledné pred záverečným testovaním.
Zabezpečenie obrazovky a zadného krytu
Použite rovnomerný tlak a nechajte lepidlo riadne vytvrdnúť. Ponáhľanie sa tu oslabuje dlhodobú odolnosť.
Testovanie po oprave a kontroly kvality
Zobrazenie, Dotknite sa, a testy jasu
Skontrolujte jednotnosť farieb, citlivosť na dotyk, a úrovne jasu. Nezabudnite na senzory priblíženia a predné kamery.
Záverečný kontrolný zoznam funkčnej kontroly
Testovacie hovory, nabíjanie, tlačidlá, a reproduktory. Oprava obrazovky ovplyvňuje viac než len vizuál.
Bežné riziká a ako sa im vyhnúť
Poškodenie ohybného kábla
Väčšina začiatočníkov tu zlyhá. Pomalé pohyby a správne uhly nástrojov sú vašou najlepšou obranou.
Defekt batérie a prehriatie
Lepidlo a riziká tlaku
Nerovnomerný tlak môže prasknúť novú obrazovku – ironicky počas inštalácie.
Opravárenské remeslo a profesionálne štandardy
Čo odlišuje čistú opravu od zlej
Čistota, vedenie káblov, a skúšobná disciplína definujú odbornú prácu.
Rozvoj dlhodobých opravárenských zručností
Každá oprava niečo naučí. Chyby v dokumentoch – sú to vaši najlepší učitelia.
Kedy nie DIY – poznať svoje limity
Vysokorizikové modely a situácie
Ultra tenké rámy, zakrivené obrazovky, a snímače pod displejom zvyšujú úroveň obtiažnosti.
Hodnotenie nákladov a rizika
Niekedy, profesionálna oprava je lacnejšia ako oprava vlastných chýb.
Tipy pre začiatočníkov a domácich majstrov
Praktické stratégie
Začnite so staršími zariadeniami. Predstavte si ich ako tréningové kolesá.
Očakávania krivky učenia
Najprv budete bojovať – a to je normálne. Zručnosť rastie s opakovaním.
Záver
Výmena LCD smartfónu nie je len o oprave obrazovky – ide o zvládnutie presnosti, trpezlivosť, a riešenie problémov. So správnymi nástrojmi, bezpečnostné myslenie, a postupný prístup, dokonca aj začiatočníci môžu dosiahnuť čistotu, spoľahlivé opravy. Či už opravujete svoj vlastný telefón alebo vstúpite do sveta opráv, táto praktická príručka vám dáva pevný základ na budovanie sebadôvery a zručností.
Časté otázky
1. Môžem vymeniť LCD obrazovku bez profesionálnych nástrojov?
Áno, ale kvalitné nástroje výrazne znižujú riziko poškodenia a zlepšujú výsledky.
2. Ako dlho trvá prvá výmena LCD?
Pre začiatočníkov počítajte s 1-2 hodinami, vrátane testovania a opätovnej montáže.
3. Je výmena LCD nebezpečná??
Môže to byť, ak sa ignoruje bezpečnosť batérie. Prísne dodržiavajte preventívne opatrenia.
4. Mám prilepiť obrazovku pred testovaním?
Nie. Pred konečnou adhéziou vždy otestujte.
5. Ako zistím, či je nový LCD chybný?
Mŕtve pixely, dotykové problémy, alebo žiadne zobrazenie počas predbežného testu indikuje chyby.


