
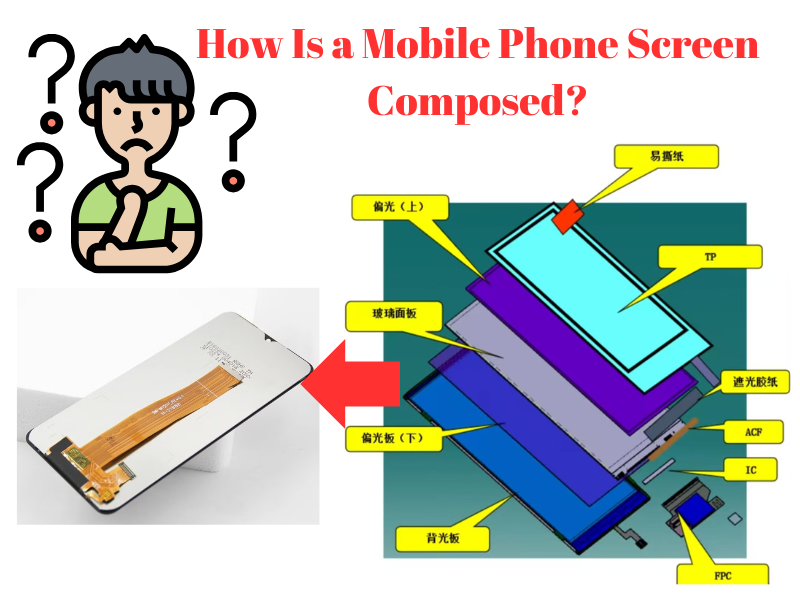
Telefonens skärm, en nyckelkomponent i vilken smartphone som helst, är det som gör att du kan se och interagera med din enhet. Oavsett om du tittar på videor, läsning, eller surfar, skärmens funktionalitet och design är avgörande. Men hur exakt är en telefonskärm monterad? Här är en steg-för-steg uppdelning av byggprocessen.
1. LCD-glas: Stiftelsen
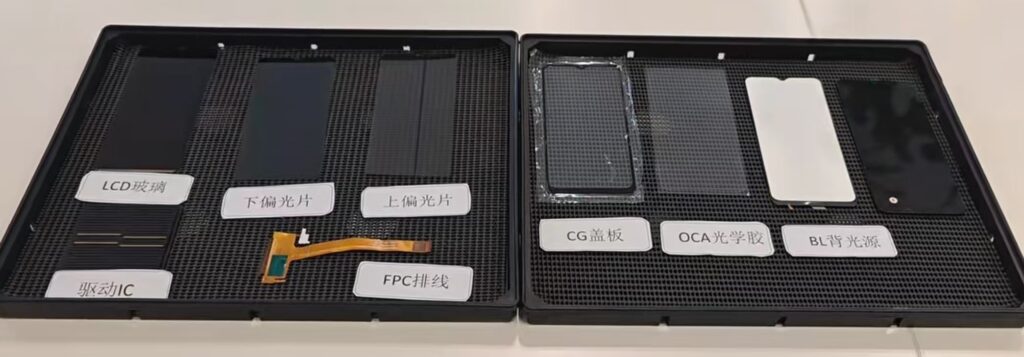
Den första komponenten i en telefonskärm är LCD-glas, som fungerar som basstruktur.
- Två ansikten av glaset:
- TF (Tunn film) Sida: Framsidan, ansvarig för att visa bilderna.
- TFT (Tunnfilmstransistor) Sida: Baksidan, ansvarig för att överföra signaler till pixlar.
Denna design med två lager säkerställer att skärmen effektivt kan visa innehåll med bibehållen strukturell integritet.
2. Applicera polarisatorer
För att förbättra skärmens visuella utgång, polarisatorer appliceras på båda sidor av LCD-glaset.
- Övre och undre polarisatorer: Dessa lager filtrerar ljus och optimerar dess inriktning, förbättra bildens klarhet och ljusstyrka.
- Ändamål: De gör det möjligt för skärmen att visa videor och bilder med bättre pixelprecision och livfullhet.
3. Lägga till drivrutin-IC och bilda FPC-modulen
De Drivrutinen IC (Integrerad krets) fungerar som skärmens hjärna, kontrollera pixlarna.
- Installation av drivrutin IC: Den är fäst på LCD-glaset, vanligtvis på ett lager känt som DETTA (Indium tennoxid).
- FPC-modulbildning: Efter installation av IC, den flexibla tryckta kretsen (FPC) läggs till för att bilda en modul. Denna modul driver glaspixlarna, gör att skärmen fungerar effektivt.
4. Applicering av OCA Optical Adhesive
När modulen är klar, OCA (Optiskt genomskinligt lim) används för att binda skikten.
- OCAs roll:
- Det säkerställer hög optisk transparens, minskar bländning och bibehåller displayens klarhet.
- Det stärker också skärmstrukturen genom att säkert fästa dess lager.
5. Fästa täckplåten
De täckplåt är skärmens yttersta skyddande lager.
- Ändamål:
- Det bestämmer skärmens form och skyddar interna komponenter.
- Den fungerar också som pekgränssnitt, tillåter användare att interagera med enheten.
Täckplattan är ofta gjord av förstärkt glas, som Gorilla Glass, för att motstå repor och skador.
6. Installation av bakgrundsbelysningen (BL)
De bakgrundsbelysning (BL) är en viktig komponent som ger belysning till skärmen.
- Fungera:
- Utan bakgrundsbelysning, LCD-skärmen skulle vara mörk och oläslig.
- Bakgrundsbelysningen lyser upp displayen jämnt, säkerställer tydlig sikt under olika ljusförhållanden.
- Typ: LED-bakgrundsbelysning används ofta för sin effektivitet och ljusstyrka.
7. Anslutning av bandkabeln
Det sista steget involverar att ansluta skärmen till telefonens moderkort via en bandkabel.
- Ändamål:
- Den överför peksignaler från skärmen till moderkortet.
- Den bär också data för att visa bilder och säkerställer sömlös kommunikation mellan skärmen och enheten.
Sammanfattning
En telefonskärm består av flera noggrant sammansatta komponenter, var och en spelar en viktig roll i dess funktionalitet. Från LCD-glas och polarisatorer till drivrutinen IC, OCA-lim, täckplåt, bakgrundsbelysning, och bandkabel, varje steg säkerställer att skärmen levererar en tydlig, känslig, och hållbar display. Att förstå denna process ger oss större uppskattning för den teknik vi använder dagligen.


