
Introduzione alla riparazione LCD dello smartphone
Al giorno d'oggi gli smartphone sono praticamente incollati alle nostre mani. Quindi quando uno schermo si rompe, sfarfallio, o diventa completamente nero, spesso segue il panico. Ma ecco la buona notizia: La sostituzione dello schermo LCD non è una magia: è un'abilità. E come ogni abilità, può essere appreso con la giusta guida.
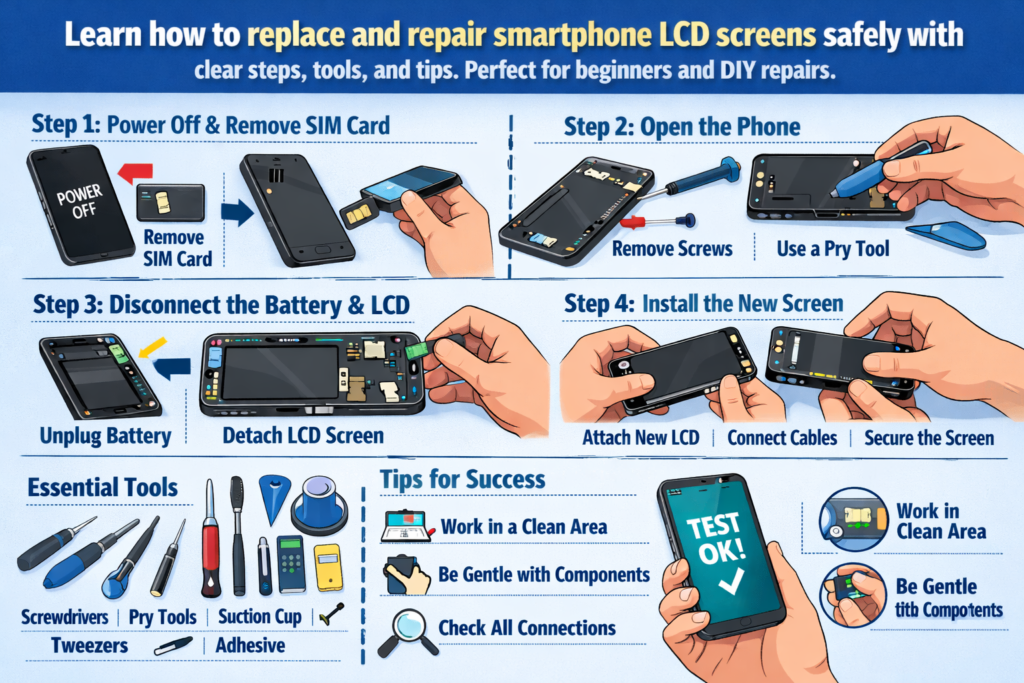
Questo manuale pratico ti guida attraverso intero processo di sostituzione del display LCD dello smartphone, dagli strumenti e dalla sicurezza all'installazione e al collaudo. Consideratela come una tabella di marcia per la riparazione: chiara, pratico, e progettato per il successo nel mondo reale.
Perché le competenze in materia di sostituzione dello schermo LCD sono importanti oggi
Il danno allo schermo è uno dei guasti più comuni degli smartphone in tutto il mondo. Imparare a sostituire uno schermo LCD può far risparmiare denaro, ridurre i rifiuti elettronici, e persino aprire le porte a una carriera di riparatore. Per principianti, è anche il punto di ingresso perfetto per la riparazione del telefono.
A chi è rivolta questa guida
Questa guida è pensata per gli appassionati del fai da te, hobbisti tecnologici, e tecnici di riparazione entry-level. Se ci hai mai pensato, “Vorrei poter risolvere il problema da solo," sei nel posto giusto.
Comprendere gli schermi LCD degli smartphone
Prima di tuffarsi con gli strumenti, è importante capire cosa stai effettivamente riparando.
LCD vs OLED: scopri cosa stai riparando
Gli schermi LCD utilizzano una retroilluminazione per illuminare i pixel, mentre gli schermi OLED illuminano ogni pixel individualmente. Molti smartphone di fascia media e più vecchi si affidano ancora agli LCD, rendendoli comuni negli scenari di riparazione. Gli LCD sono generalmente più convenienti ma leggermente più spessi e più complessi da separare.
Scenari comuni di danni allo schermo LCD
Danno fisico
Vetro rotto, angoli frantumati, e i punti di pressione sono i segni più evidenti. Anche se il display funziona ancora, il danno strutturale spesso peggiora nel tempo.
Errori di visualizzazione e tocco
Linee sullo schermo, tocchi fantasma, aree non reattive, o l'assenza totale di display spesso indica un danno al display LCD o al cavo flessibile.
Preparazione degli strumenti e dei materiali essenziali
Una riparazione è valida tanto quanto gli strumenti dietro di essa. Usare strumenti impropri è come cucinare con un martello: è possibile, ma disordinato.
Kit di strumenti di riparazione di base
Al minimo, ne avrai bisogno:
- Cacciaviti di precisione
- Strumenti a leva in plastica
- Pinzette
- Ventosa
- Fonte di calore (pistola ad aria calda o cuscino riscaldante)
Strumenti professionali e fai da te
Gli strumenti professionali offrono un migliore controllo e riducono il rischio di danni, ma i principianti possono iniziare con kit fai-da-te di qualità. Evita gli strumenti metallici quando possibile: sono assassini di cavi flessibili.
Materiali di consumo da non saltare mai
Alcol isopropilico, strisce adesive, guanti, e i tappetini antistatici possono sembrare facoltativi, ma migliorano significativamente la qualità e la sicurezza della riparazione.
La sicurezza prima di tutto: precauzioni critiche prima dello smontaggio
Saltare i passaggi di sicurezza è il modo più rapido per trasformare una semplice riparazione in un disastro.
Energia, Batteria, e rischi legati all'elettricità statica
Spegnere sempre completamente il dispositivo. Scollegare la batteria il prima possibile per evitare cortocircuiti. L'elettricità statica può uccidere silenziosamente i componenti, quindi radicarsi è importante.
Best practice per la configurazione dell'area di lavoro
Lavora su un piano pulito, superficie ben illuminata. Organizza le viti come pezzi di un puzzle: mescolandole potresti rompere la scheda madre in seguito.
Processo di smontaggio del telefono passo dopo passo
Rimozione della cover posteriore
A seconda del modello, ciò potrebbe comportare viti, adesivo, o clip. Applicare un calore delicato per ammorbidire l'adesivo e fare leva lentamente. Correre qui spesso rompe i dorsi di vetro.
Scollegamento sicuro della batteria
Perché la sicurezza della batteria non è negoziabile
Le batterie al litio sono sensibili. Non forare mai, curva, o surriscaldarli. Una batteria danneggiata non è solo costosa: è pericolosa.
Rimozione dello schermo LCD danneggiato
Questo è il cuore della riparazione e la parte più rischiosa.
Tecniche di riscaldamento e rammollimento dell'adesivo
Anche la distribuzione del calore è fondamentale. Troppo poco calore non rilascerà l'adesivo; troppo può danneggiare gli strati interni. La pazienza batte ogni volta la forza.
Separazione dello schermo senza danni al cavo
Spiegazione delle zone a rischio del cavo flessibile
La maggior parte dei cavi flessibili si trova vicino alla parte inferiore o laterale dello schermo. Inserisci gli strumenti di leva in modo superficiale e scopri sempre dove si trovano i cavi prima di sollevarli.
Ispezione e pulizia dei componenti interni
Controllo dei connettori e dei cavi flessibili
Ispezionare i perni piegati, polvere, o residuo. Un singolo pin disallineato può causare guasti al display.
Pulizia dell'adesivo residuo e della polvere
Le superfici pulite garantiscono una migliore adesione e prevengono punti di pressione sul nuovo schermo.
Installazione del nuovo schermo LCD
Test pre-installazione
Prima di sigillare qualsiasi cosa, collegare il nuovo LCD e accendere il dispositivo. Questo passaggio da solo consente di risparmiare innumerevoli rielaborazioni.
Corretto allineamento e collegamento dei cavi
Evitare errori di installazione comuni
Non forzare mai i connettori. Se non fa clic correttamente, c'è qualcosa che non va. Il disallineamento porta a perdite di luce e problemi di tocco.
Processo di riassemblaggio
Riconnessione dei componenti nell'ordine corretto
Invertire logicamente i passaggi di smontaggio. Il collegamento della batteria dovrebbe sempre essere effettuato per ultimo prima del test finale.
Fissare lo schermo e la cover posteriore
Applicare una pressione uniforme e consentire all'adesivo di polimerizzare correttamente. Correre qui indebolisce la durabilità a lungo termine.
Test post-riparazione e controlli di qualità
Display, Tocco, e test di luminosità
Controllare l'uniformità del colore, reattività al tocco, e livelli di luminosità. Non dimenticare i sensori di prossimità e le fotocamere anteriori.
Lista di controllo finale dell'ispezione funzionale
Chiamate di prova, ricarica, pulsanti, e altoparlanti. Una riparazione dello schermo non influisce solo sulla grafica.
Rischi comuni e come evitarli
Danni al cavo flessibile
La maggior parte dei principianti fallisce qui. Movimenti lenti e angoli corretti dell'utensile sono la tua migliore difesa.
Foratura e surriscaldamento della batteria
Rischi adesivi e di pressione
Una pressione irregolare può rompere un nuovo schermo, ironicamente durante l'installazione.
Artigianato di riparazione e standard professionali
Ciò che distingue una riparazione pulita da una cattiva
Pulizia, instradamento dei cavi, e la disciplina dei test definiscono il lavoro professionale.
Sviluppare capacità di riparazione a lungo termine
Ogni riparazione insegna qualcosa. Documenta gli errori: sono i tuoi migliori insegnanti.
Quando non fare il fai-da-te: conoscere i propri limiti
Modelli e situazioni ad alto rischio
Cornici ultrasottili, schermi curvi, e i sensori sotto il display aumentano il livello di difficoltà.
Valutazione dei costi e dei rischi
A volte, la riparazione professionale è più economica che correggere i propri errori.
Suggerimenti per principianti e appassionati del fai da te
Strategie pratiche
Inizia con i dispositivi più vecchi. Considerateli come ruote da allenamento.
Aspettative della curva di apprendimento
All’inizio farai fatica, ed è normale. L'abilità cresce con la ripetizione.
Conclusione
La sostituzione dell'LCD dello smartphone non consiste solo nel riparare uno schermo, ma anche nel padroneggiare la precisione, pazienza, e risoluzione dei problemi. Con gli strumenti giusti, mentalità di sicurezza, e un approccio graduale, anche i principianti possono ottenere risultati puliti, riparazioni affidabili. Che tu stia riparando il tuo telefono o entrando nel mondo delle riparazioni, questo manuale pratico ti fornisce una solida base per sviluppare sicurezza e abilità.
FAQ
1. Posso sostituire uno schermo LCD senza strumenti professionali?
SÌ, ma gli strumenti di qualità riducono significativamente il rischio di danni e migliorano i risultati.
2. Quanto tempo richiede la prima sostituzione del display LCD??
Aspettatevi 1–2 ore per i principianti, compresi test e riassemblaggio.
3. La sostituzione del display LCD è pericolosa??
Può essere se la sicurezza della batteria viene ignorata. Seguire rigorosamente le precauzioni.
4. Dovrei incollare lo schermo prima del test?
NO. Testare sempre prima dell'adesione finale.
5. Come faccio a sapere se il nuovo LCD è difettoso?
Pixel morti, problemi di tocco, o l'assenza di visualizzazione durante il test preliminare indica difetti.


