
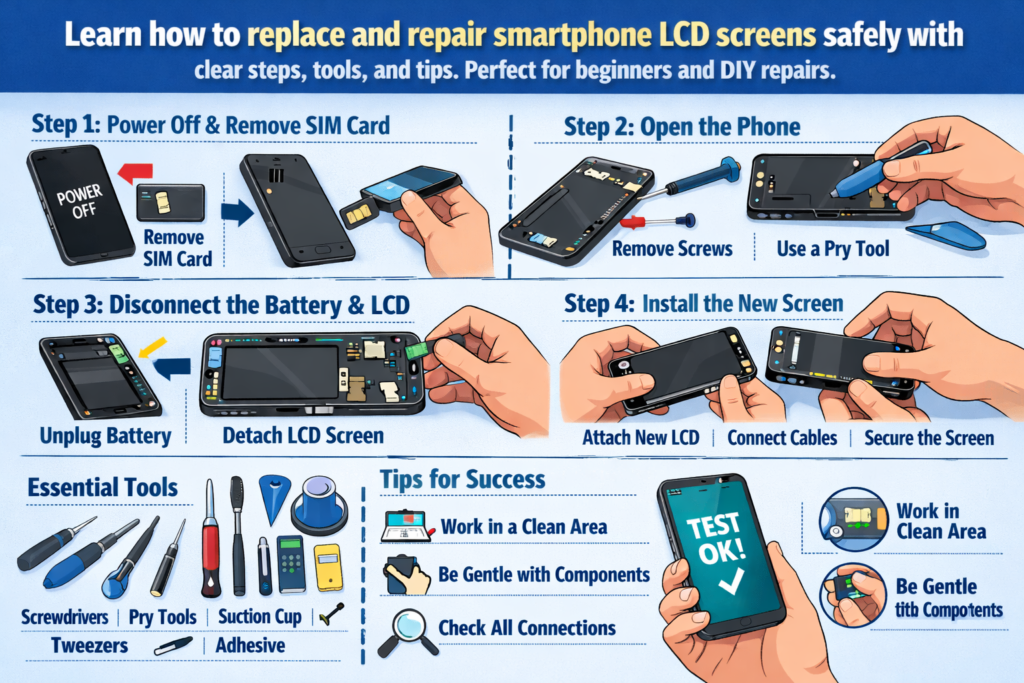
Inleiding tot LCD-reparatie van smartphones
Smartphones zijn tegenwoordig praktisch aan onze handen gekluisterd. Dus als een scherm barst, flikkert, of wordt helemaal zwart, paniek volgt vaak. Maar hier is het goede nieuws: Het vervangen van een LCD-scherm is geen magie, het is een vaardigheid. En zoals elke vaardigheid, het kan worden geleerd met de juiste begeleiding.
Deze praktische handleiding leidt u door de geheel LCD-vervangingsproces voor smartphones, van gereedschap en veiligheid tot installatie en testen. Zie het als een reparatieroutekaart – duidelijk, praktisch, en ontworpen voor succes in de echte wereld.
Waarom vaardigheden op het gebied van LCD-schermvervanging vandaag de dag belangrijk zijn
Schermschade is wereldwijd een van de meest voorkomende smartphonestoringen. Leren hoe u een LCD-scherm kunt vervangen, kan geld besparen, e-waste verminderen, en opent zelfs deuren naar een reparatiecarrière. Voor beginners, het is ook het perfecte startpunt voor telefoonreparatie.
Voor wie is deze gids bestemd
Deze handleiding is gemaakt voor doe-het-zelvers, technische hobbyisten, en reparatietechnici op instapniveau. Als je ooit hebt nagedacht, “Ik wou dat ik dit zelf kon oplossen,” je bent op de juiste plaats.
LCD-schermen van smartphones begrijpen
Voordat je met gereedschap aan de slag gaat, het is belangrijk om te begrijpen wat u daadwerkelijk repareert.
LCD versus OLED – Weet wat u repareert
LCD-schermen gebruiken achtergrondverlichting om pixels te verlichten, terwijl OLED-schermen elke pixel afzonderlijk verlichten. Veel smartphones uit het middensegment en oudere smartphones zijn nog steeds afhankelijk van LCD's, waardoor ze gebruikelijk zijn in reparatiescenario's. LCD's zijn over het algemeen goedkoper, maar iets dikker en complexer om te scheiden.
Veelvoorkomende scenario's voor LCD-schade
Fysieke schade
Gebarsten glas, verbrijzelde hoeken, en drukplekken zijn de meest voor de hand liggende tekenen. Zelfs als het display nog werkt, structurele schade verergert vaak in de loop van de tijd.
Weergave- en aanraakfouten
Lijnen op het scherm, geest raakt, niet-reagerende gebieden, of helemaal geen display duiden vaak op schade aan het LCD-scherm of de flexkabel.
Voorbereiding van essentiële gereedschappen en materialen
Een reparatie is slechts zo goed als het gereedschap erachter. Het gebruik van onjuist gereedschap is als koken met een hamer: mogelijk, maar rommelig.
Basisreparatieset
Minimaal, je hebt nodig:
- Precisie schroevendraaiers
- Kunststof wrikgereedschap
- Pincet
- Zuignap
- Warmtebron (heteluchtpistool of verwarmingskussen)
Professioneel versus doe-het-zelf-gereedschap
Professioneel gereedschap biedt betere controle en vermindert het schaderisico, maar beginners kunnen beginnen met hoogwaardige doe-het-zelfpakketten. Vermijd waar mogelijk metalen wrikgereedschappen: het zijn flexibele kabelmoordenaars.
Verbruiksartikelen die u nooit mag overslaan
Isopropylalcohol, plakstrips, handschoenen, en antistatische matten lijken misschien optioneel, maar ze verbeteren de reparatiekwaliteit en veiligheid aanzienlijk.
Veiligheid eerst – Kritieke voorzorgsmaatregelen vóór demontage
Het overslaan van veiligheidsstappen is de snelste manier om van een eenvoudige reparatie een ramp te maken.
Stroom, Batterij, en risico's van statische elektriciteit
Schakel het apparaat altijd volledig uit. Koppel de accu zo vroeg mogelijk los om kortsluiting te voorkomen. Statische elektriciteit kan componenten stilletjes doden, dus jezelf aarden is belangrijk.
Best practices voor het instellen van de werkruimte
Werk aan een schone, goed verlicht oppervlak. Organiseer schroeven als puzzelstukjes: als je ze door elkaar haalt, kan het moederbord later kapot gaan.
Stapsgewijs demontageproces van de telefoon
De achtercover verwijderen
Afhankelijk van het model, hierbij kunnen schroeven betrokken zijn, lijm, of clips. Breng lichte hitte aan om de lijm zacht te maken en wrik langzaam los. Als je je hier haast, barst vaak de achterkant van het glas.
De batterij veilig loskoppelen
Waarom batterijveiligheid niet onderhandelbaar is
Lithiumbatterijen zijn gevoelig. Nooit doorprikken, kromming, of oververhit ze. Een beschadigde batterij is niet alleen duur, maar ook gevaarlijk.
Het beschadigde LCD-scherm verwijderen
Dit is het hart van de reparatie en het meest risicovolle onderdeel.
Verwarmings- en lijmverzachtingstechnieken
Een gelijkmatige warmteverdeling is cruciaal. Bij te weinig warmte komt de lijm niet vrij; te veel kan de interne lagen beschadigen. Geduld wint het elke keer van kracht.
Schermscheiding zonder kabelschade
Risicozones voor flexkabels uitgelegd
De meeste flexkabels zitten aan de onderkant of zijkant van het scherm. Plaats wrikgereedschap ondiep en weet altijd waar de kabels zich bevinden voordat u deze optilt.
Inspecteren en reinigen van interne componenten
Connectoren en flexkabels controleren
Controleer op verbogen pinnen, stof, of residu. Een enkele verkeerd uitgelijnde pin kan een displayfout veroorzaken.
Resterende lijm en stof reinigen
Schone oppervlakken zorgen voor een betere hechting en voorkomen drukpunten op het nieuwe scherm.
Het nieuwe LCD-scherm installeren
Testen vóór installatie
Voordat je iets verzegelt, sluit het nieuwe LCD-scherm aan en schakel het apparaat in. Deze stap alleen al bespaart talloze herbewerkingen.
Juiste uitlijning en kabelaansluiting
Veelvoorkomende installatiefouten vermijden
Forceer nooit connectoren. Als het niet soepel klikt, er is iets mis. Een verkeerde uitlijning leidt tot lichtlekken en aanrakingsproblemen.
Hermontageproces
Componenten opnieuw aansluiten in de juiste volgorde
Voer de demontagestappen logisch in omgekeerde volgorde uit. De batterijverbinding moet altijd als laatste plaatsvinden vóór de laatste test.
Het scherm en de achterkant beveiligen
Oefen gelijkmatige druk uit en laat de lijm goed uitharden. Hierheen haasten verzwakt de duurzaamheid op lange termijn.
Tests en kwaliteitscontroles na reparatie
Weergave, Aanraken, en helderheidstesten
Controleer de kleuruniformiteit, aanrakingsgevoeligheid, en helderheidsniveaus. Vergeet de naderingssensoren en camera's aan de voorkant niet.
Laatste functionele inspectiechecklist
Testoproepen, opladen, knoppen, en luidsprekers. Een schermreparatie heeft meer invloed dan alleen het visuele aspect.
Veelvoorkomende risico's en hoe u ze kunt vermijden
Flexkabelschade
De meeste beginners falen hier. Langzame bewegingen en de juiste gereedschapshoeken zijn uw beste verdediging.
Batterij lek en oververhitting
Kleef- en drukrisico's
Ongelijke druk kan een nieuw scherm laten barsten, ironisch genoeg tijdens de installatie.
Reparatievakmanschap en professionele normen
Wat een schone reparatie onderscheidt van een slechte reparatie
Netheid, kabelgeleiding, en testdiscipline definiëren professioneel werk.
Het ontwikkelen van reparatievaardigheden op de lange termijn
Elke reparatie leert iets. Documenteer fouten: zij zijn je beste leraren.
Wanneer u niet aan het klussen bent: ken uw grenzen
Modellen en situaties met een hoog risico
Ultradunne randen, gebogen schermen, en sensoren onder het display verhogen de moeilijkheidsgraad.
Kosten versus risico-evaluatie
Soms, professionele reparatie is goedkoper dan het herstellen van uw eigen fouten.
Tips voor beginners en doe-het-zelvers
Oefenstrategieën
Begin met oudere apparaten. Zie ze als zijwieltjes.
Leercurveverwachtingen
In het begin zul je het moeilijk hebben - en dat is normaal. Vaardigheden groeien met herhaling.
Conclusie
Het vervangen van LCD-schermen bij smartphones gaat niet alleen over het repareren van een scherm, het gaat over het beheersen van precisie, geduld, en probleemoplossend. Met het juiste gereedschap, veiligheidsmentaliteit, en stapsgewijze aanpak, zelfs beginners kunnen schoon bereiken, betrouwbare reparaties. Of je nu je eigen telefoon repareert of de reparatiewereld betreedt, dit praktische handboek geeft u een solide basis om vertrouwen en vaardigheden op te bouwen.
FAQ's
1. Kan ik een LCD-scherm vervangen zonder professioneel gereedschap??
Ja, maar kwaliteitsinstrumenten verminderen het schaderisico aanzienlijk en verbeteren de resultaten.
2. Hoe lang duurt een eerste LCD-vervanging??
Reken op 1 à 2 uur voor beginners, inclusief testen en opnieuw monteren.
3. Is LCD-vervanging gevaarlijk??
Dit kan gebeuren als de veiligheid van de batterij wordt genegeerd. Volg de voorzorgsmaatregelen strikt.
4. Moet ik het scherm lijmen voordat ik ga testen??
Nee. Test altijd vóór de definitieve hechting.
5. Hoe weet ik of het nieuwe LCD-scherm defect is??
Dode pixels, problemen met aanraken, of geen weergave tijdens de pre-test duiden op defecten.


